Overview
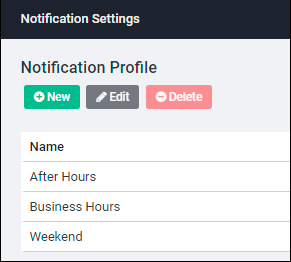
As an AlertFind administrator, you can define the default settings that apply to all users for Default Notification Profiles, which set the order in which devices should be contacted for a notification. The default notification profiles are After Hours, Business Hours, and Weekend. You can create new profiles and edit existing ones. For example, you could create a Holiday profile to define how your users should be contacted on holidays.
Solution
Set up only the minimum number of profiles to adequately manage the different ways in which your users should be notified. For example, if your users should be notified the same way on holidays as they are on weekends, there is no need to create a separate Holiday notification profile. You could rename the Weekend notification profile to Weekends and Holidays and use that profile for both instances.
Create a New Default Notification Profile
- From the left navigation menu, Administration section, click Application Settings
- Locate the Personal Escalation Profiles section. Click Edit next to Personal Escalation Profiles. Step 3 of the Default Personal Escalation Wizard appears
- Under the Notification Settings section, click the Notification Profile tab
- To create a new profile, click New. The Edit Profile page appears
- Name the new profile by typing the name in the Profile Name field
- Optionally, provide a description in the Profile Type field
- Click Save. The Edit Notification Profile page appears
- Add a device to the escalation list by clicking a device and dragging it to the list in the right column
- To add a delay between devices, drag the After 5 minutes escalate to option into the list in the right column. To change the amount of time to any number other than 5 minutes, double-click the After 5 minutes... option in the right column. This opens the Delay dialog box, where you can type another number of minutes
- Click Save to save the new profile
- Click Save again at the Step 3 of the Default Personal Escalation Wizard
Edit or Delete a Default Notification Profile
- From the left navigation menu, Administration section, click Application Settings
- Locate the Personal Escalation Profiles section. Click Edit next to Personal Escalation Profiles. Step 3 of the Default Personal Escalation Wizard appears
- Under the Notification Settings section, click the Notification Profile tab
- To edit a profile, either double-click it or highlight it and click Edit. The Edit Notification Profile window appears. Add, remove, or reorder devices and delays, then click Save
- To delete a profile, highlight it and click Delete
Priyanka Bhotika
Comments